Charging Instructions for Motorcycle Battery
After long periods of storage (2 months or more), the battery will need to be recharged when the terminal voltage falls below the required voltage. When recharging, please keep yourself and your colleagues safe by following all the relevant safety recommendations (such as wearing protective glasses).
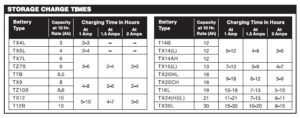
To charge a powersports battery, refer to your vehicle owner’s manual and your battery charger manual for instructions. Review the safety instructions that came with your charger and battery. Remember that batteries contain sulfuric acid that can cause severe burns and hydrogen-oxygen gases that can be explosive. Read the complete safety section on this website.
Safe Charging
NEVER ATTEMPT TO CHARGE A BATTERY WITHOUT FIRST REVIEWING THE INSTRUCTIONS FOR THE CHARGER BEING USED. In addition to the charger manufacturer’s instructions, these general precautions should be followed:
- Always wear proper eye, face and hand protection.
- Always charge batteries in a well-ventilated area.
- Keep vents tight and level.
- Turn the charger and timer OFF before connecting the leads to the battery to avoid dangerous sparks.
- Never try to charge a visibly damaged or frozen battery.
- Connect the charger leads to the battery: red positive (+) lead to the positive (+) terminal and black negative (-) lead to the negative (-) terminal. If the battery is still in the vehicle, connect the negative lead to the engine block to serve as a ground. Be sure the ignition and all electrical accessories are turned off. (If the vehicle has a positive ground, connect the positive lead to the engine block.)
- Make sure that the charger leads to the battery are not broken, frayed or loose.
- Set the timer, turn the charger on and slowly increase the charging rate until the desired ampere value is reached.
- If the battery becomes hot, or if violent gassing or spewing of electrolyte occurs, reduce the charging rate or turn off the charger temporarily.
- Always turn the charger OFF before removing charger leads from the battery to avoid dangerous sparks.
How do I jump-start my vehicle?

FIRST, READ AND FOLLOW ALL SAFETY INSTRUCTIONS
WARNING — BATTERIES PRODUCE EXPLOSIVE GASES.
These instructions are designed to minimize the explosion hazard while jump-starting a car. Keep sparks, flames and cigarettes away from batteries at all times.
- Both batteries should be of the same voltage (6, 12, etc.).
- When jump-starting, always wear proper eye protection and never lean over the battery.
- Do not jump start a damaged battery; inspect both batteries before connecting booster cables.
- Be sure vent caps are tight and level.
- Be sure that the vehicles are not touching and that both ignition switches are in the “OFF” position.
- Turn off all electrical equipment (radio, defroster, windshield wipers, lights, etc.).
The following steps should be followed exactly:
- Connect positive (+) booster cable to positive (+) terminal of discharged battery.
- Connect other end of positive (+) cable to positive (+) terminal of assisting battery.
- Connect negative (-) cable to negative (-) terminal of assisting battery.
- MAKE FINAL CONNECTION OF NEGATIVE (-) CABLE TO ENGINE BLOCK OF STALLED VEHICLE, AWAY FROM BATTERY AND CARBURETOR.
- Be sure that cables are clear of fan blades, belts and other moving parts of both engines.
- Start vehicle and remove cables in REVERSE order of connections.
Ways To Revive A Dead ATV Battery
Having your ATV battery not turn over can be a really terrible time. At home, you can charge it using your battery charger, but if you are out on a trail or at a campsite, it can be scary when it won’t start. But all is not lost. There are a few ways you can get your ATV battery going again.
Compression Start an ATV Battery
The Compression Start is where you basically trick the ATV into starting. What happens is you get the wheels moving, and that can trick the engine into rolling over. Once it is on, it will charge the Battery as you drive.
Turn on the key or switch and put your ATV into first gear. Sometimes, if you cannot get it rolling fast enough, you may need to put it into second gear. Pull the clutch up and get the ATV rolling to 10 MPH. Then let out the clutch and add gas as your hear the engine try to turn. This should make the engine fire. Make sure to pull in the clutch once it’s started to make sure you don’t crash
ATV Jump Start
This is a really useful way to jump start your ATV as you will usually be cruising with at least one other ATV. This is a fairly simple way to get your ATV running, it’s merely jumping it like when you jump a car.
Connect the cables to the good battery first, then connect the bad Battery. When you connect the black wire, or the ground Wire, it is usually better to just attach it to the frame as there is not a lot of room on the battery. Just make sure it is grounded. Start the good battery first and let it idle for a few minutes. Then try starting the bad battery. Once it starts, remove the red wire first, then the black from the newly started ATV, repeat for the other. Let this ATV idle for a while before you turn it off.
Car Jump Start an ATV Battery
You can actually use a car to jump start an ATV. This can be really useful if you just drove for miles and miles to a location and then found out your ATV isn’t turning over.
Connect the wires like you would with any other ATV/ATV or car/car set up. Then, do NOT turn on the car. The car battery is much stronger than the ATV battery, and if you turned it on you could cause problems to the ATV Battery. Instead, just try to turn on the ATV. If it was the battery preventing it from starting, then it should turn over.
These three ways to get your ATV battery going can be really useful when you find yourself stranded. Knowing the power of your machine, what it can do, and how to get it going is very important for this. But try to take good care of your battery at all times, and check to make sure it is in working condition before you leave.


